After updating the Air Quality Monitor with LoPy4 board, when I finally got it up and running with Wi-Fi, I moved on to working on LoRa connectivity. I previously had little to none experience with LoRa, so it took me some time, but it was totally worth it.
This is a story of how I got the air quality sensor to transmit its data via LoRa, from the balcony of my flat, over LoRaWAN nano-gateway to TTN router in the Netherlands, then to my relay server elsewhere in Europe, and to the database on the Raspberry Pi in the living room of the same flat. Just because it can™. Buckle up!
[caption id="attachment_547" align="alignnone" width="1024"] The overview of LoRaWAN architecture. Source: https://www.thethingsnetwork.org/docs/[/caption]
But what's the big deal with LoRa?
LoRa, as in "Low-Power Long-Range" is a wireless communication technology of relatively small bandwidth, with an effective range of up to several kilometres, or even more in the open area. It uses an unrestricted frequency band of 868MHz for Europe, 915MHz for Americas, Australia and New Zealand, and 470-510MHz for China.
Then, the LoRaWAN is a type of Low Power Wide Area Network (LPWAN), which uses LoRa connectivity. The LoRa-enabled end-devices (nodes) connect to the network (the internet) via LoRaWAN gateways in a similar fashion to mobile phones connecting to GSM network via GSM base stations. I mean, a node isn't assigned to a specific gateway (like in the case of WiFi, when you connect to the given router), but rather it can use any gateway that's in its range.
A LoRaWAN gateway has the internet connection and passes the data packets from the device (uplink) to the LoRaWAN router. The router then forwards them to the associated web service. It can also handle downlink messages, i.e. data packets sent from the web service back to the device, in response to received uplink messages.
The LoRa's bandwidth of only 0.3-50kbps is not suitable for every use case – you wouldn't certainly be streaming a video camera footage or even transferring files with it. But it's a great fit for connected devices such as various types of sensors (environmental, agricultural or industrial just to name a few) to exchange tiny bits of data. And, most importantly, as the name suggests, data transfer using LoRa requires significantly less power than other wireless technologies like Wi-Fi or Bluetooth LE. You can get more info about LoRa and LoRaWAN at the LoRa Alliance website.
While LoRa exists without LoRaWAN, as you can just set up a 1-1 connection between LoRa-enabled devices, I'll focus on LoRaWAN in this article.
My setup
Obviously, in order to make use of LoRaWAN, your node must be in range of a LoRaWAN gateway. This is not the case for me yet, but I'm working on getting one – BTW, it's not extremely expensive as you can build a decent GW for under €200 - see this document for a nice how-to. Hope is not lost though, as you can actually turn a LoRa device into a so-called nano-gateway. A nano GW has some significant limitations – e.g. it requires a specific configuration for devices connecting to it. It's therefore not suitable for public use but works just fine for development, or for personal use.
[caption id="attachment_533" align="aligncenter" width="580"]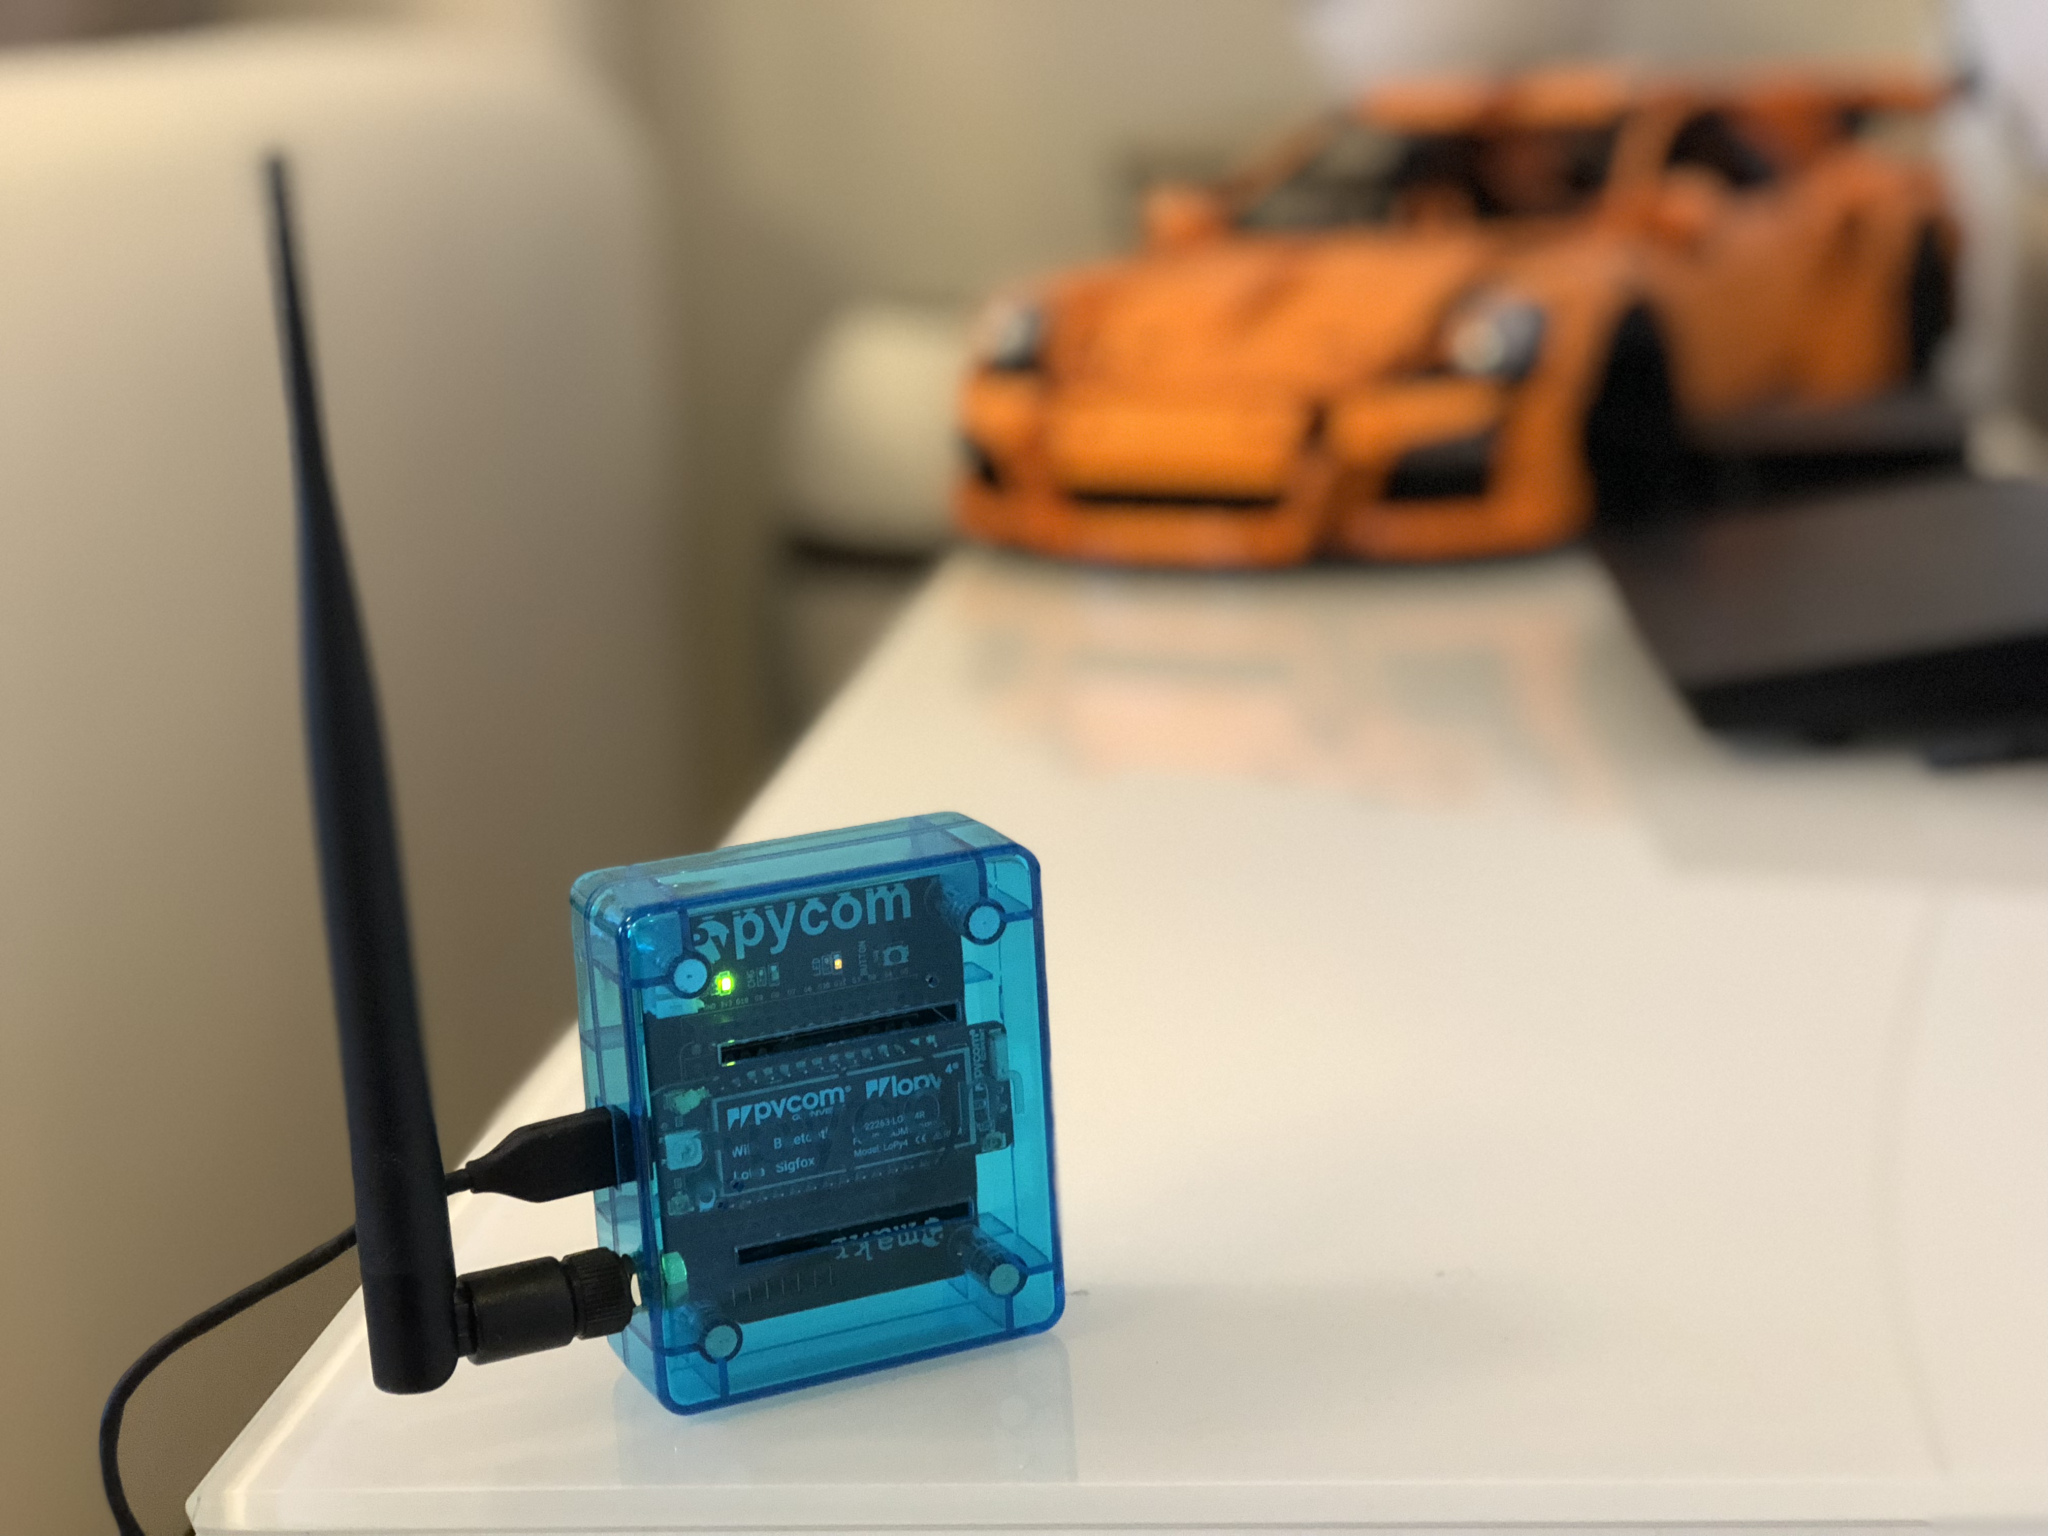 A LoPy4 serving as a LoRaWAN nano-gateway.[/caption]
Quite a while ago, in November last year, I preordered two LoPy4 boards to evaluate LoRa connectivity myself. I received them mid-January, and for a first test, I wanted to connect my air quality monitor to LoRaWAN. One of the boards would replace the WiPy in the sensor, and the other one would serve as a nano-gateway.
Setting up a nano-gateway is dead simple – it's well documented and you can get the most up-to-date sample code from Pycom's GitHub. Replacing WiPy with LoPy4 in the air quality monitor was a bit trickier and deserved a separate blog post, but here it is:
[caption id="attachment_536" align="aligncenter" width="580"]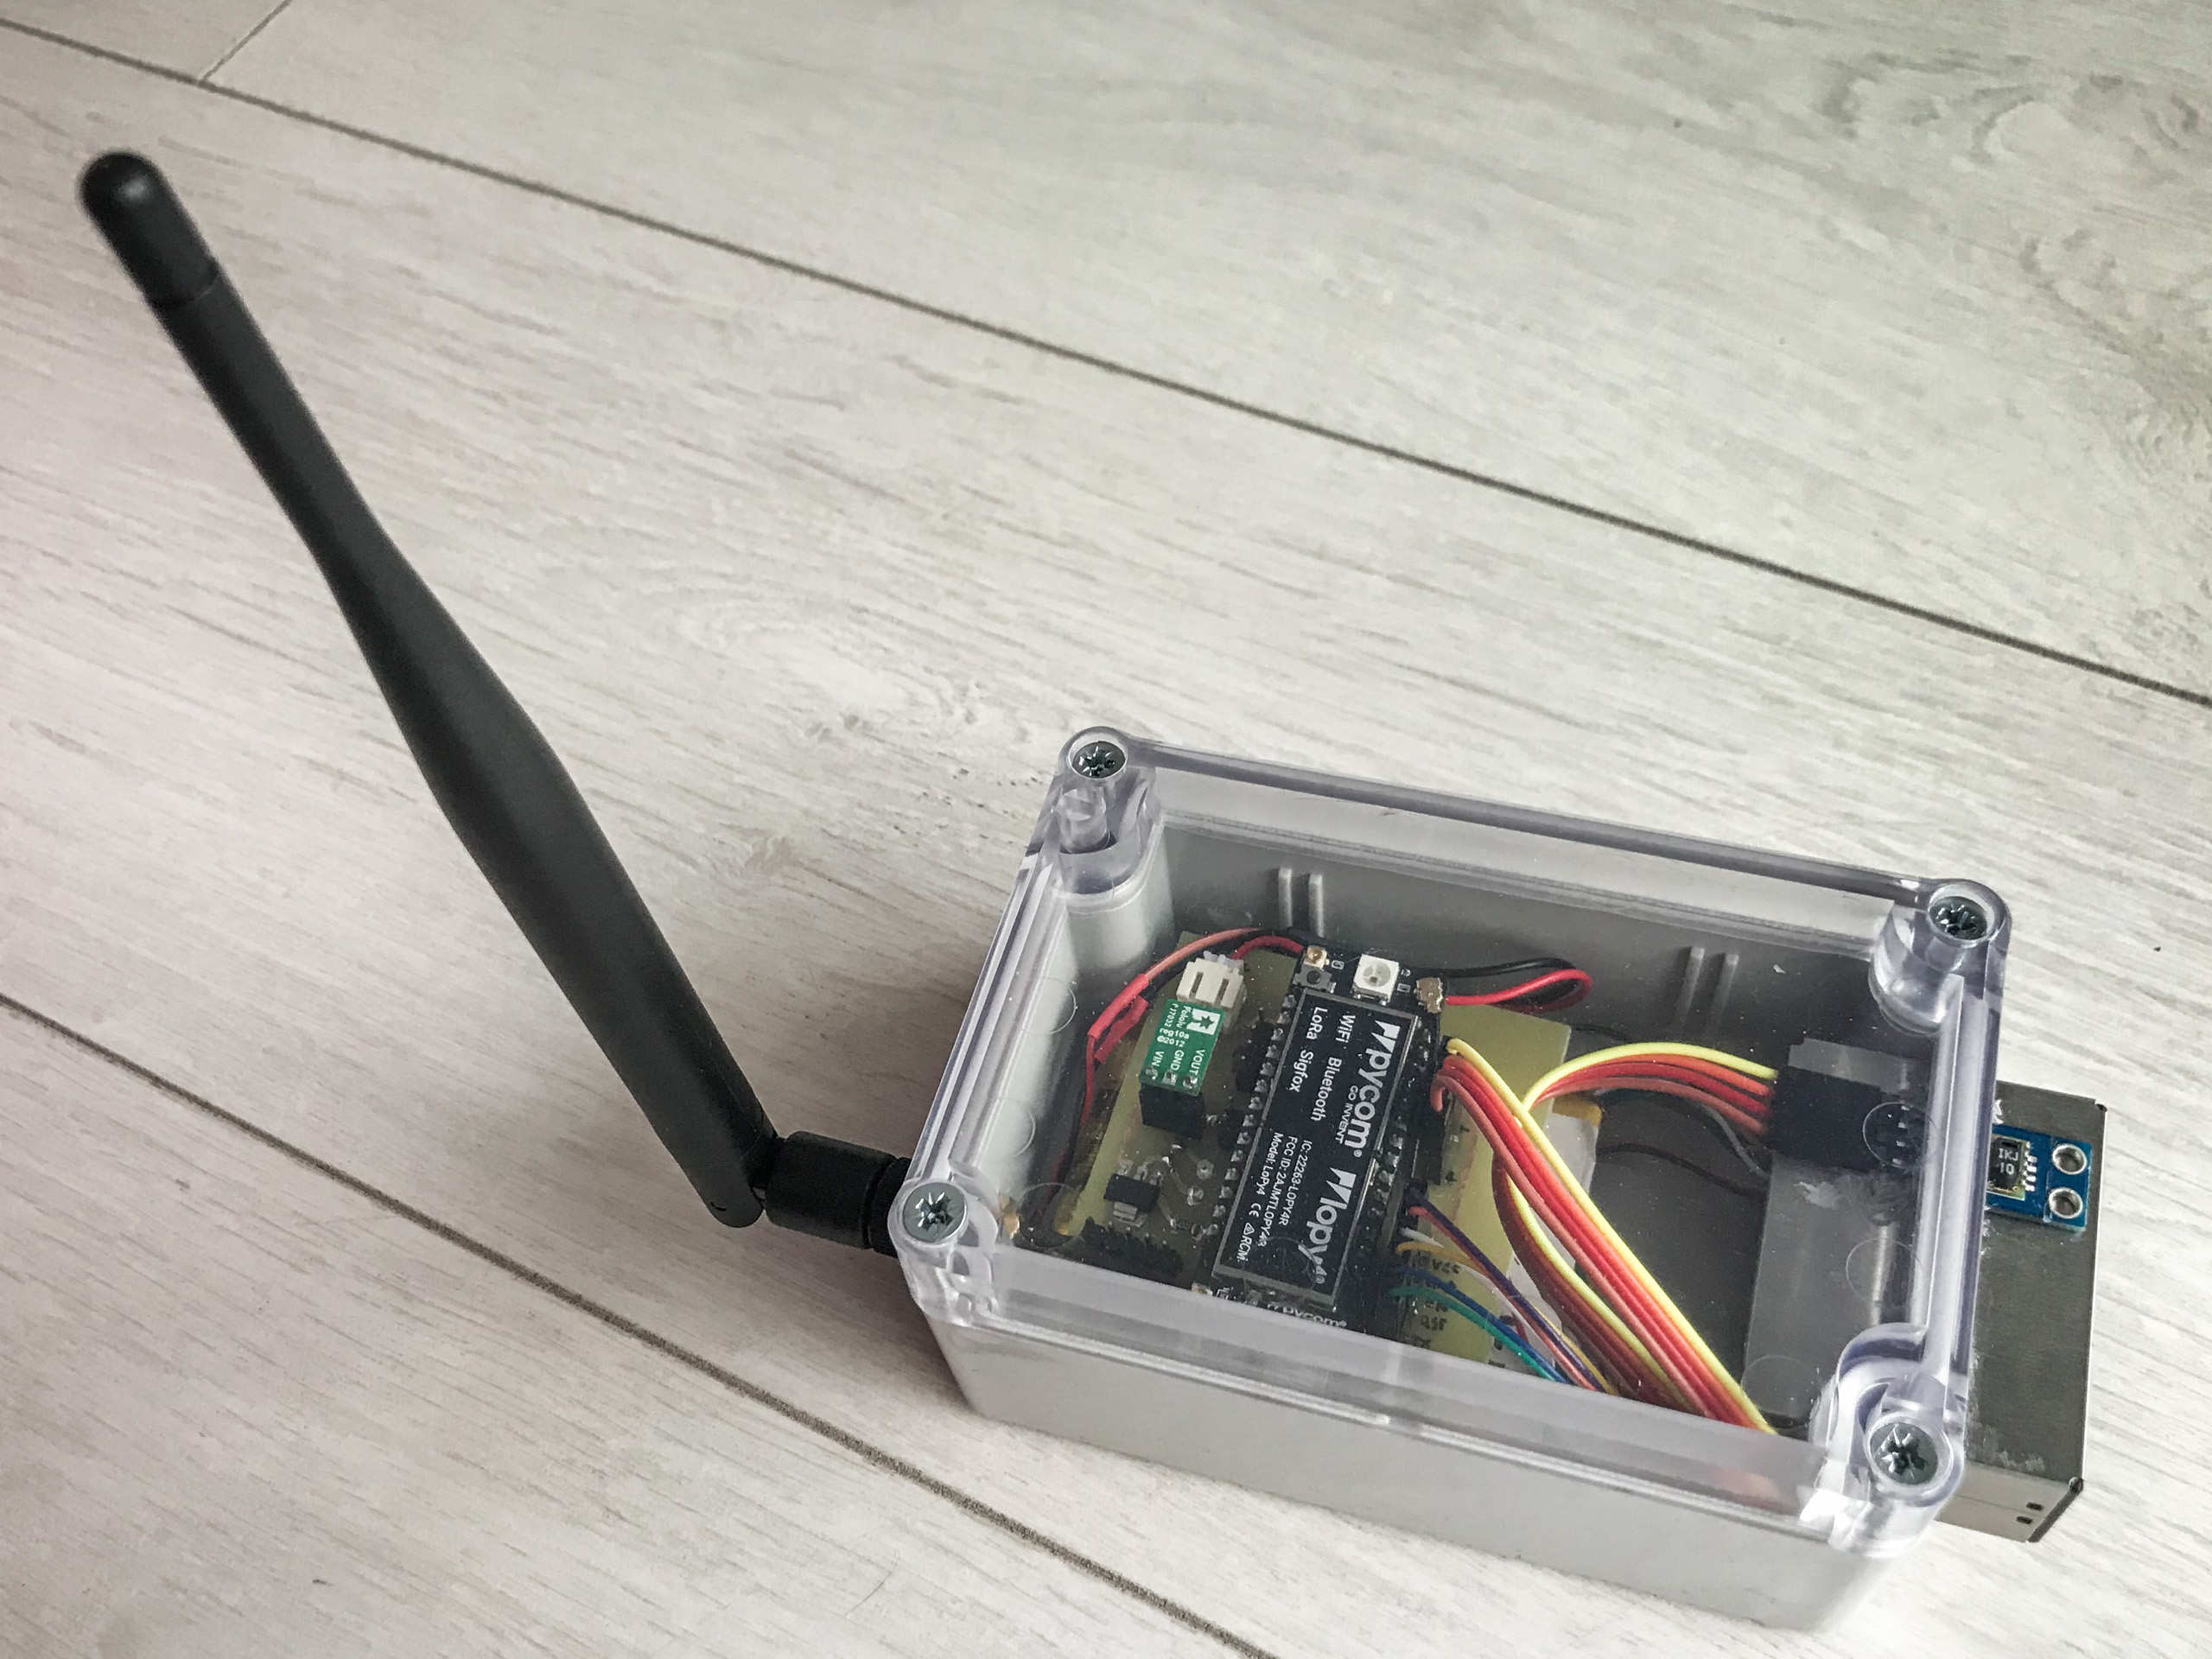 The LoRa-enabled version of the Air Quality Monitor.[/caption]
Connecting to LoRaWAN network
Once you get the gateway up and running you need to connect it to the LoRaWAN router. There are a couple of public LoRaWAN network operators and The Things Network is arguably the most popular one.
Setting up the nano-gateway
If you're within LoRaWAN network range and you don't need to make your own gateway you can skip this step.
Otherwise, after booting up the nano-gateway you need to register it at the TTN website. This is a simple process, already documented in many places, including Pycom docs, so I'll skip it here. It's also pretty straightforward and the only thing to remember when doing it for the nano-gateway is to be sure to check the "I'm using the legacy packet forwarder" checkbox.
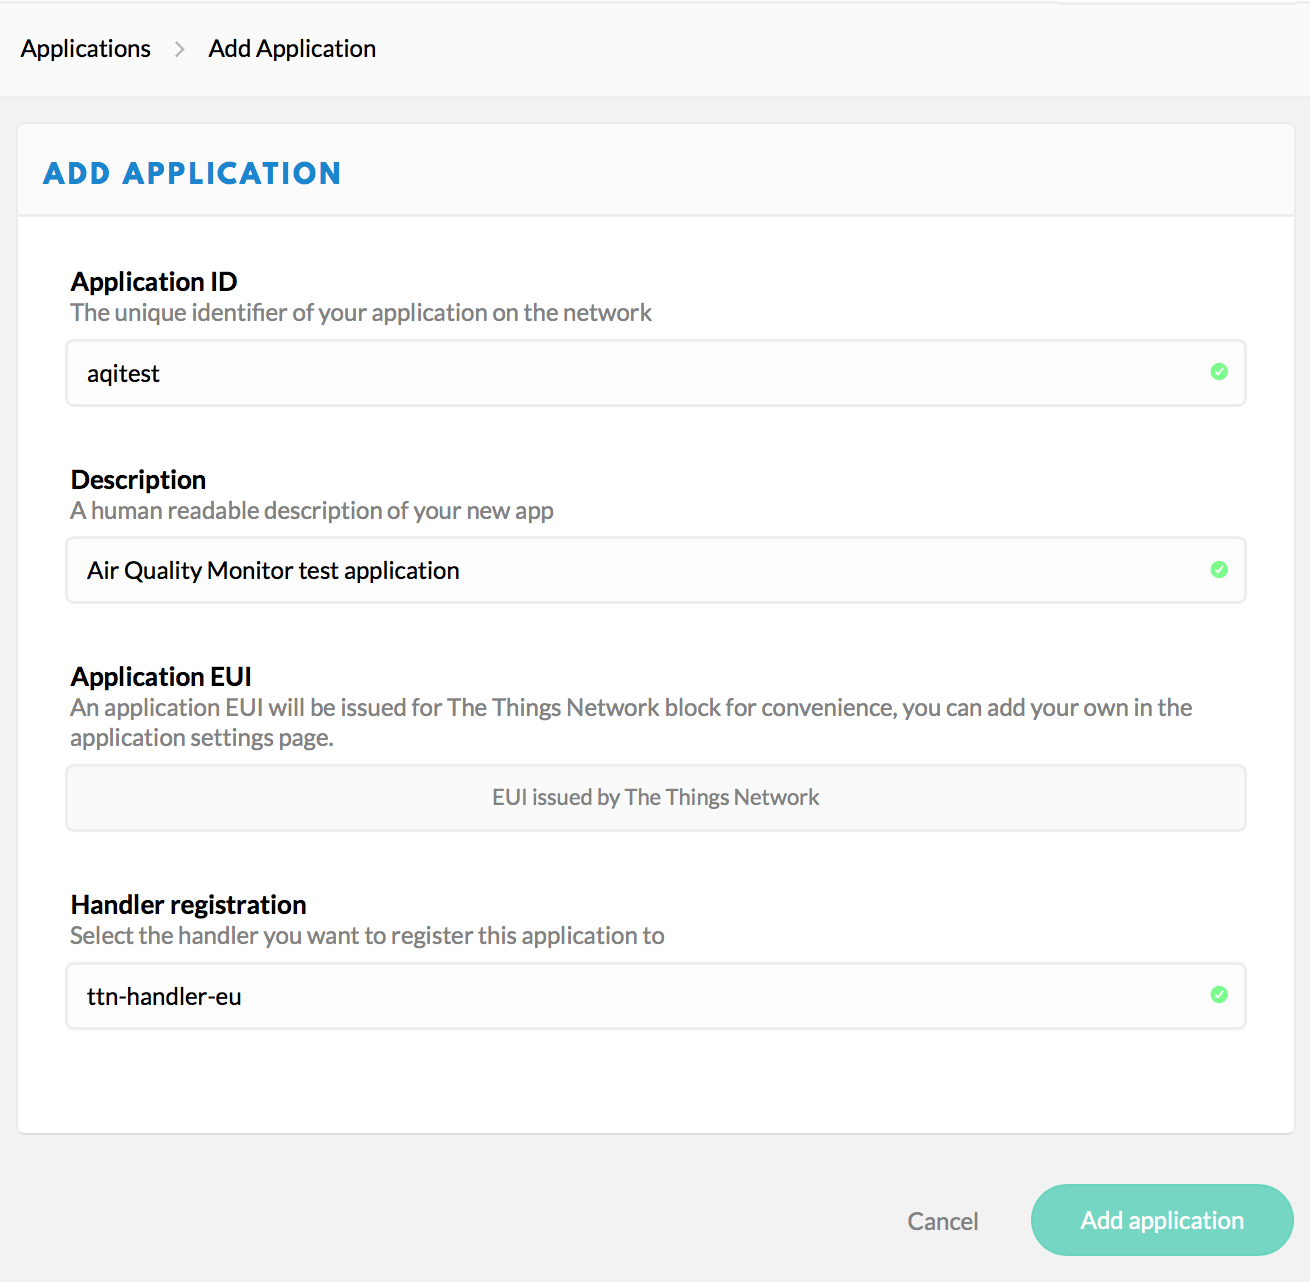
Creating a TTN Application
To do something actually useful with your data you'll need to pass it on from TTN to the service that would handle and process it appropriately. This is done by an application, that you create and configure in TTN console:
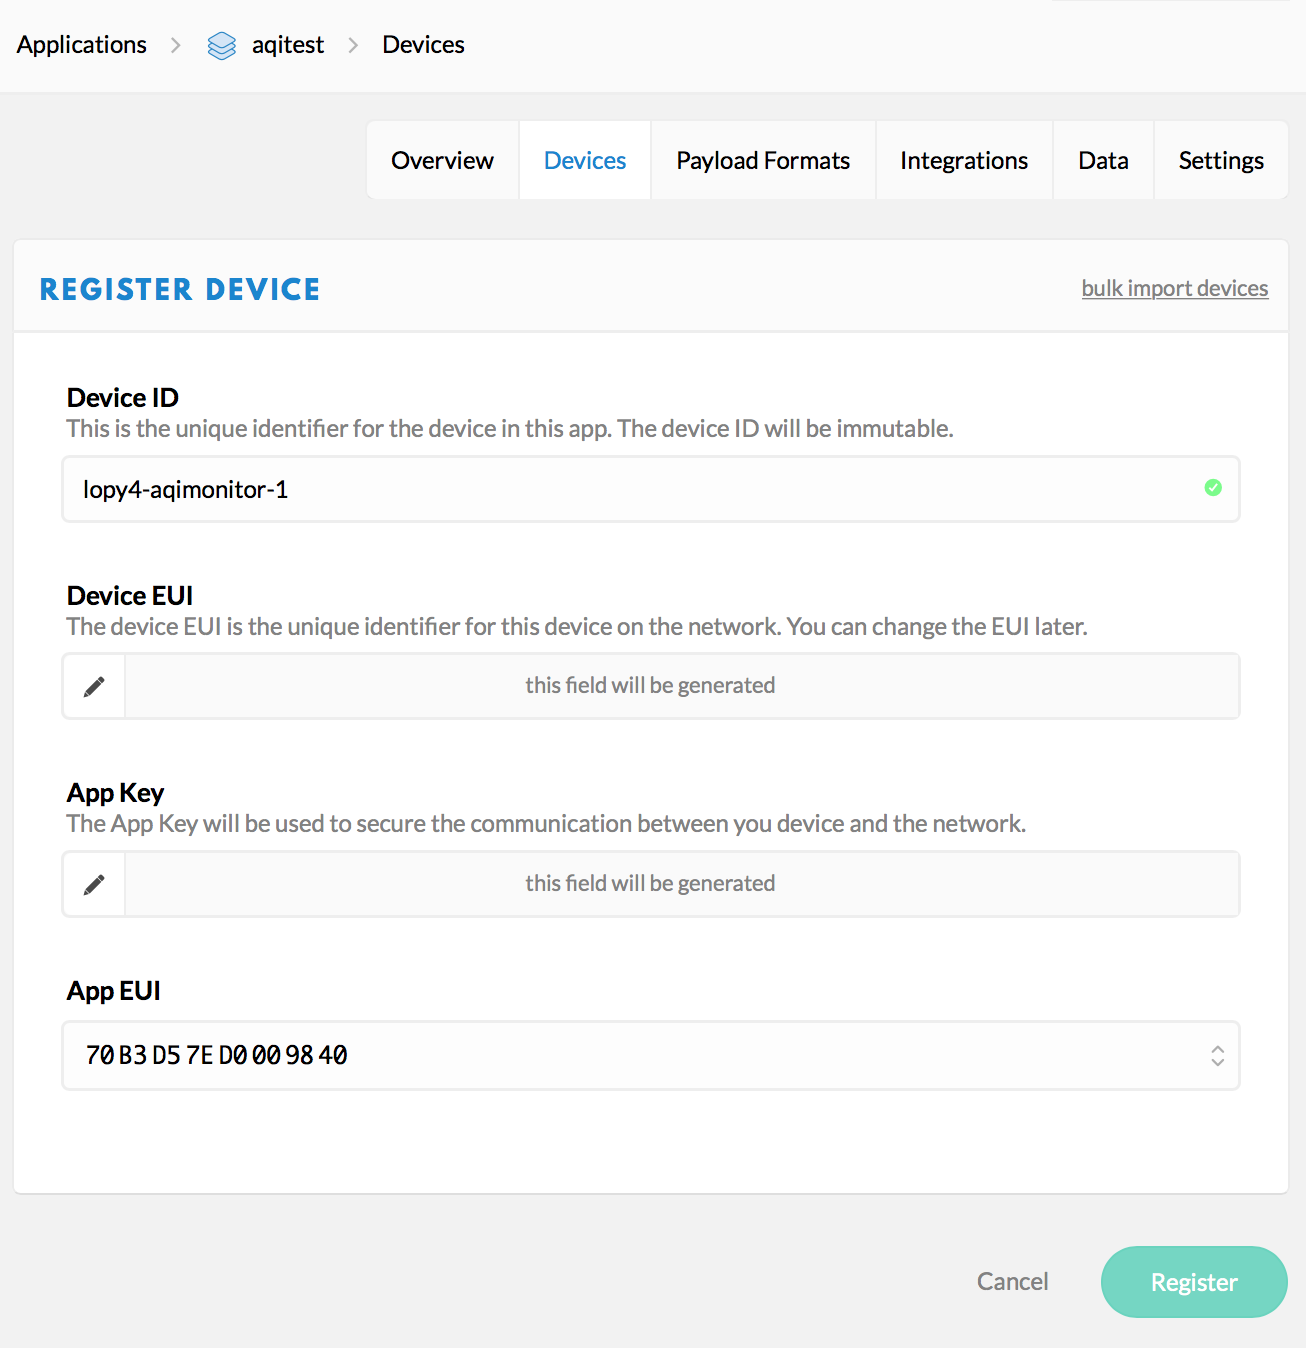
Setting up the node
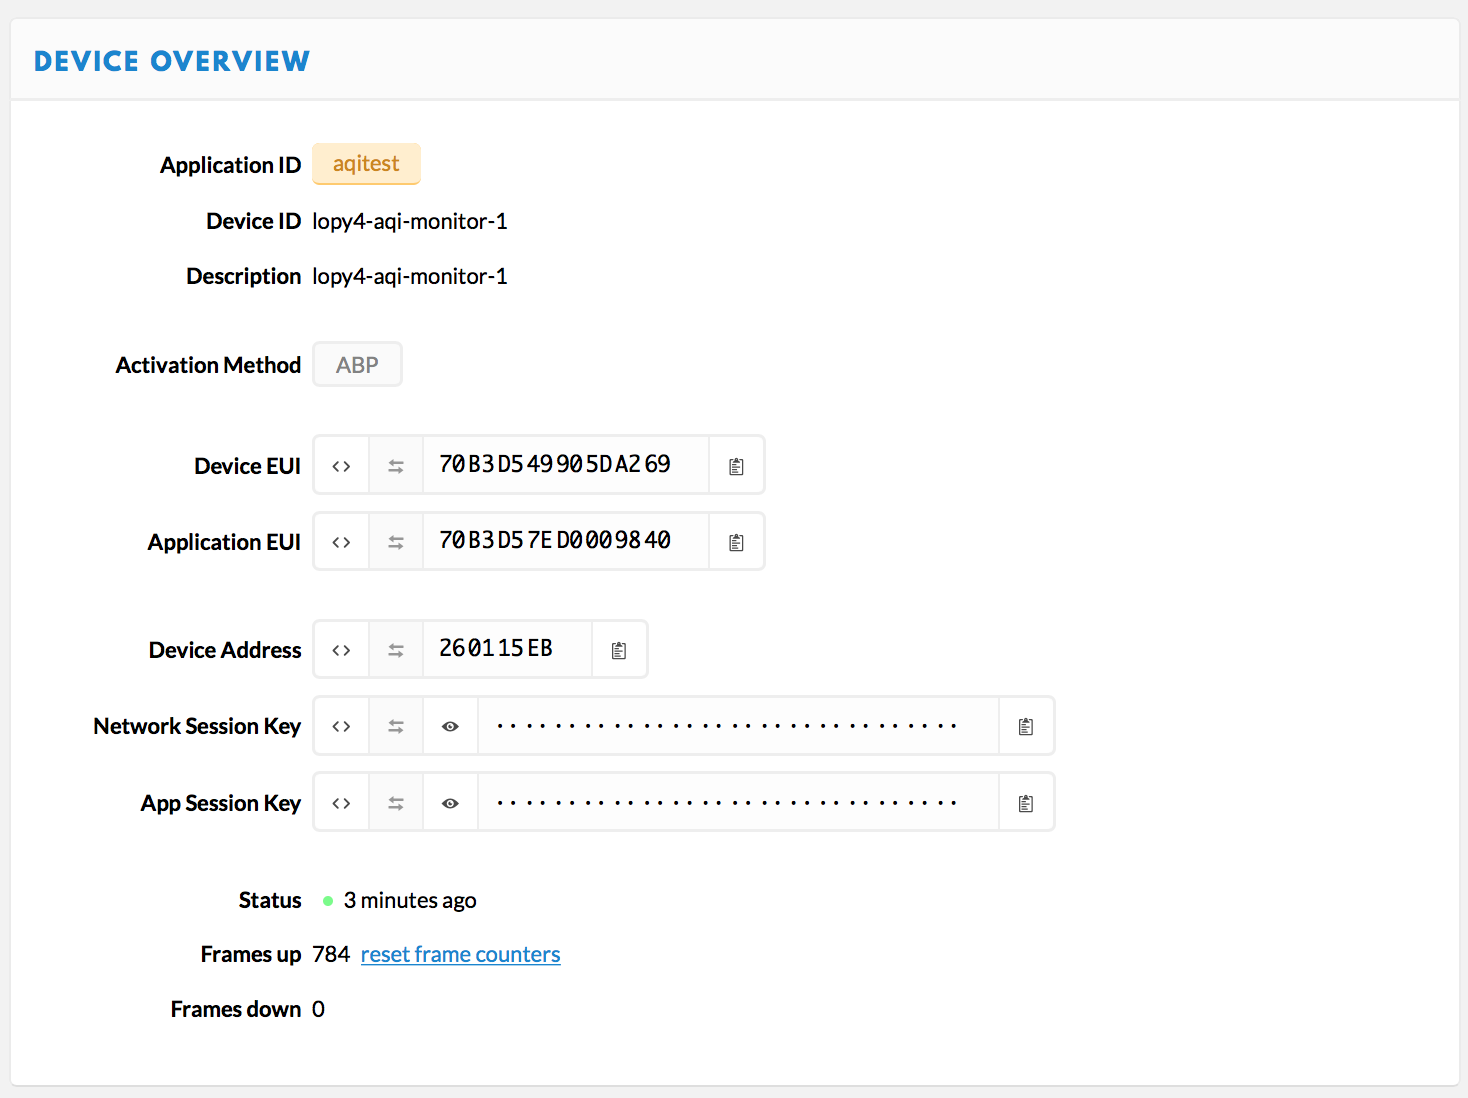
The node needs to be registered in the TTN too, and it's configured at the application scope:
The important thing that you need to choose when configuring a LoRaWAN node is the authentication mode, i.e. how nodes are authorized with the application. Two modes are available: Over-the-Air Activation (OTAA), and Activation by Personalization (ABP). Although there are significant differences between these two, at the basic "my-first-app" level we don't need to go that deep into details.
For a proof-of-concept connecting to LoRaWAN, there's an example code for both OTAA and ABP nodes available from GitHub (otaa_node.py and abp_node.py). In my case, I had some troubles connecting the node using OTAA. It might be me, the faulty firmware at that time, or some other reason, but I saw people on Pycom's forum complaining that they couldn't make OTAA work with nano-gateway too. Anyways, I ended up going with ABP. It's as simple as copying the Device Address, Application Session Key and Network Session Key from device settings to the node script, and boom, it's online!
Communication over LoRa
Once you connect the node to LoRaWAN, the communication is as simple as creating a socket and writing bytes to it. The following MicroPython code does that for LoPy4:
# create a LoRa socket
s = socket.socket(socket.AF_LORA, socket.SOCK_RAW)
# set the LoRaWAN data rate
s.setsockopt(socket.SOL_LORA, socket.SO_DR, 5)
# make the socket blocking
s.setblocking(True)
# send the data
payload = b'\x00\x01\x02\x03'
s.send(payload)
If everything works, you should see the packet appear on the TTN application console.
Sending actual data
In case of my air quality sensor, I had several values to serialize and send. I went with the simple solution of converting numeric values to integers and writing them as bytes:
def to_bytes(self):
    # pm10 [ug/m^3] - int - 2b
    # pm25 [ug/m^3] - int - 2b
    # temp [K] - int - 2b
    # humidity [%] - int - 2b
    # voltage (mV) - int - 2b
    # duration (ms) - int - 2b
    # version - str

    payload = b''
    payload += int(self.pm10).to_bytes(2, 'little')
    payload += int(self.pm25).to_bytes(2, 'little')
    temp_k = self.temperature + 273.15
    payload += int(temp_k*100).to_bytes(2, 'little')
    payload += int(self.humidity*100).to_bytes(2, 'little')
    payload += int(self.voltage).to_bytes(2, 'little')
    payload += int(self.duration).to_bytes(2, 'little')
    payload += self.version
    return payload
To simplify serializing temperature, I converted it to Kelvins (but adding e.g. 50 would work fine too) to avoid negative values for sub-zero °C data points. Multiplying by 100 allowed me to store temperature and humidity as integers while keeping the resolution of 2 fraction digits.
Handling data at TTN
TTN application allows you to define JavaScript handlers for decoding the payload, converting its fields and validating them before forwarding to your server. These handlers are not required, but they give you an opportunity to convert the binary payload to a pretty formatted JSON file, e.g. like this:
function bin2String(array) {
    var result = "";
    for (var i = 0; i < array.length; i++) {
        result += String.fromCharCode(parseInt(array[i], 10));
    }
    return result;
}

function Decoder(bytes, port) {
    var decoded = {};
    decoded.pm10 = bytes[0] + (bytes[1]<<8);
    decoded.pm25 = bytes[2] + (bytes[3]<<8);
    decoded.temperature = ((bytes[5]<<8) + bytes[4])/100 - 273.15;
    decoded.humidity = ((bytes[7]<<8) + bytes[6])/100;
    decoded.vbatt = (bytes[9]<<8) + bytes[8];
    decoded.duration = (bytes[11]<<8) + bytes[10];
    decoded.version = bin2String(bytes.slice(12, bytes.length));
    return decoded;
}
The above code running in my TTN application can turn this payload:
52 00 45 00 30 6B 29 22 0E 02 98 2A 30 2E 38 2E 30
into the following JSON:
{
    "duration": 10904,
    "humidity": 87.45,
    "pm10": 82,
    "pm25": 69,
    "temperature": 1.25,
    "vbatt": 526,
    "version": "0.8.0"
}
Consuming data
Having preprocessed the raw payload we can pass it on to the destination. This is where TTN app integrations come into play. If you're fortunate enough to be using one of the listed services, you can take advantage of its dedicated built-in handler:
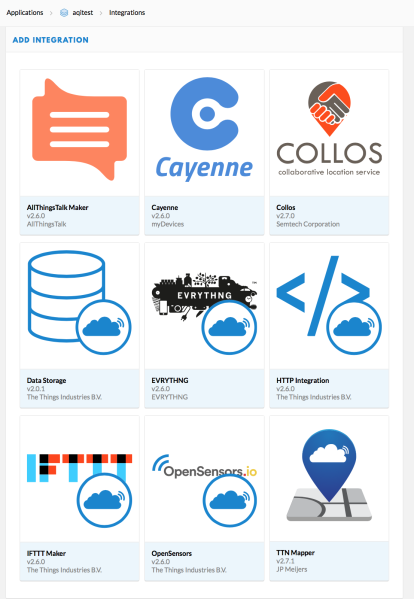
In all other cases, there's a generic HTTP Integration that allows you to forward the (optionally prettified) payload to the server of your choice. That was exactly my case, as I needed the data back at home, in the InfluxDB server running on my Raspberry Pi.
As InfluxDB comes with an HTTP API, I technically could set up the integration so that it points directly to the InfluxDB server (it would, however, require a different payload format than JSON). But for a more generic case, when you want to add another integration in future, it's better to keep the JSON format and forward it to the relay server that would process the data accordingly for all services you support.
TTN-to-InfluxDB forwarding microservice
My recipe for a minimal forwarding web service is:
This will be really quick:
from flask import Flask, request, jsonify
import requests

app = Flask(__name__)

@app.route('/aqi', methods=['POST'])
def forward_aqi():
    influx_response = influxdb(request.json['payload_fields'])
    success = len(influx_response) == 0
    return jsonify(success=success,
                   response=influx_response.decode('utf-8'))

def influxdb(payload):
    influx_data = 'aqi,version={} pm25={},pm10={},temperature={},'\
                  'humidity={},voltage={},duration={}' \
        .format(payload['version'], payload['pm25'],
                payload['pm10'], payload['temperature'],
                payload['humidity'], payload['vbatt'],
                payload['duration'])
    return requests.post("http://ax616034.ngrok.io/write?db=mydb",
                         data=influx_data).content
This is all the code required to set up a single-endpoint Python web service with Flask, that would read JSON data from POST payload, convert it to InfluxDB format and post it to the database. Welcome to Python!
Putting it on Heroku is another story, but it took me just a couple of minutes with the documentation found online. And it was my first experience with Heroku (yes, apparently I've been living in a cave).
HTTP Integration at TTN
This, again, is a no-brainer. Once the web service is up, all you have to do is pass the right URL to the HTTP Integration:
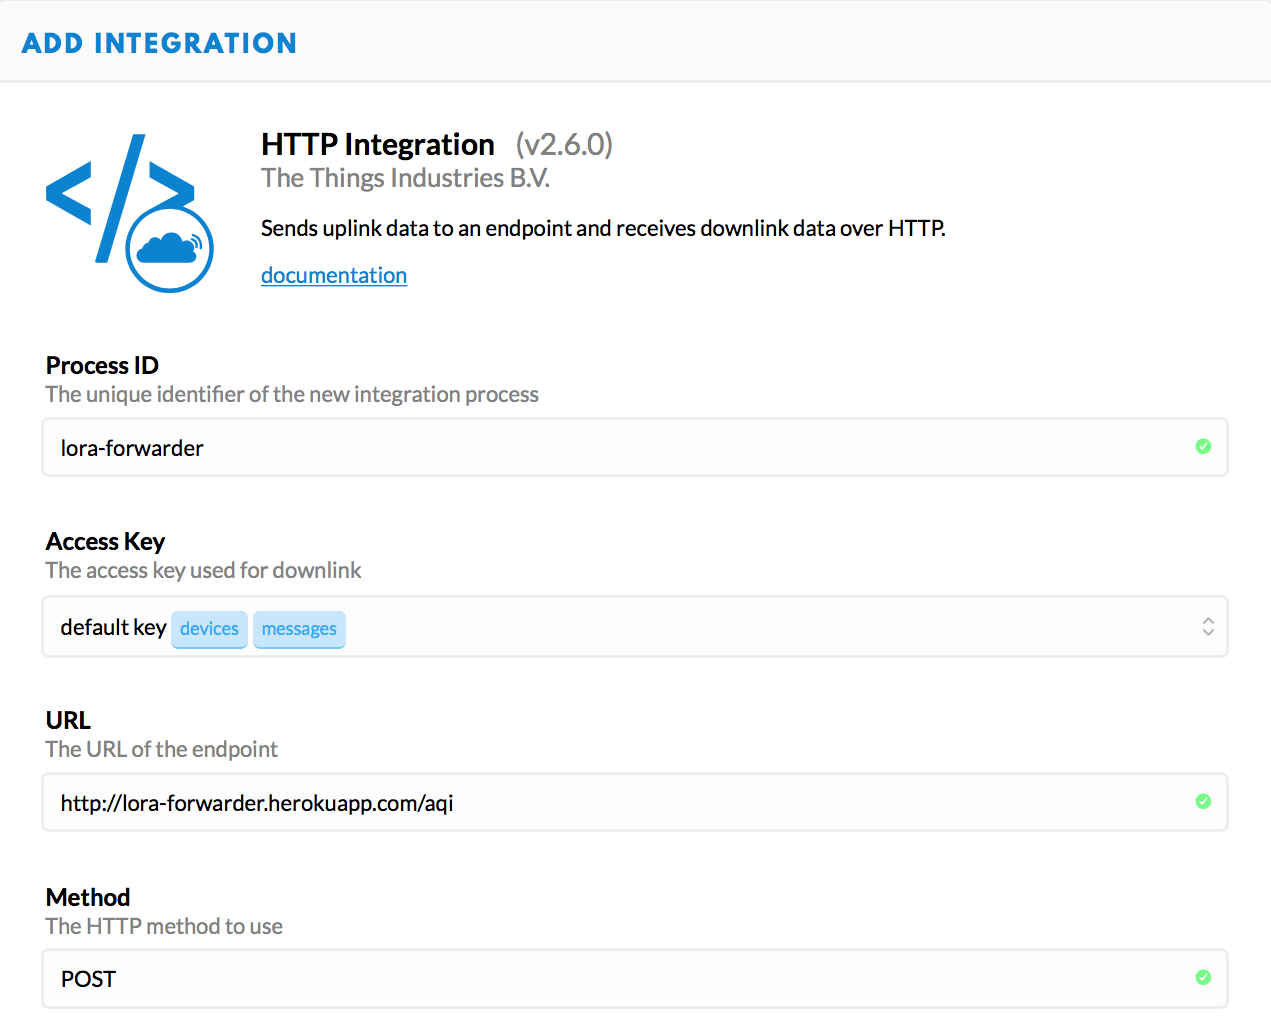
There are additional fields to fill in on that form, such as header fields, including authorization (highly recommended for a production server), but this is the minimal required configuration.
Watch bytes flowing
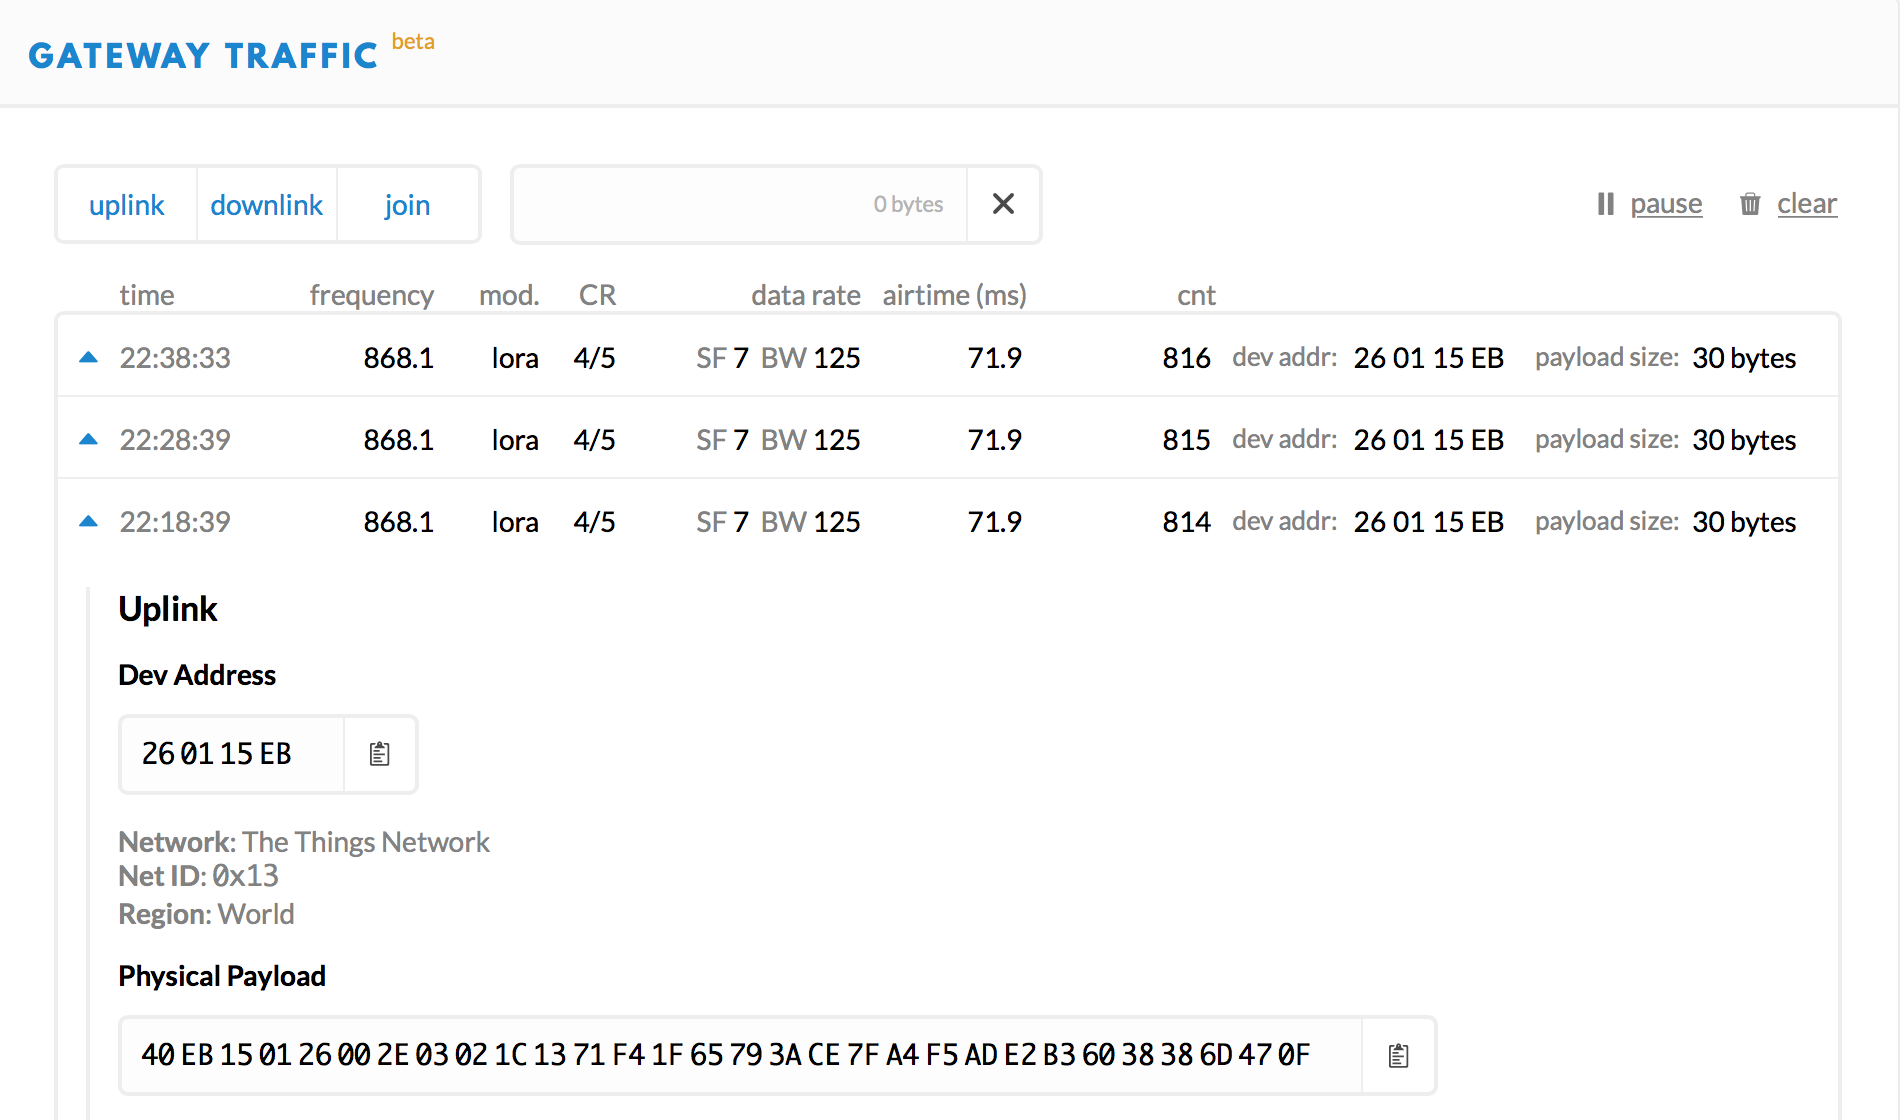
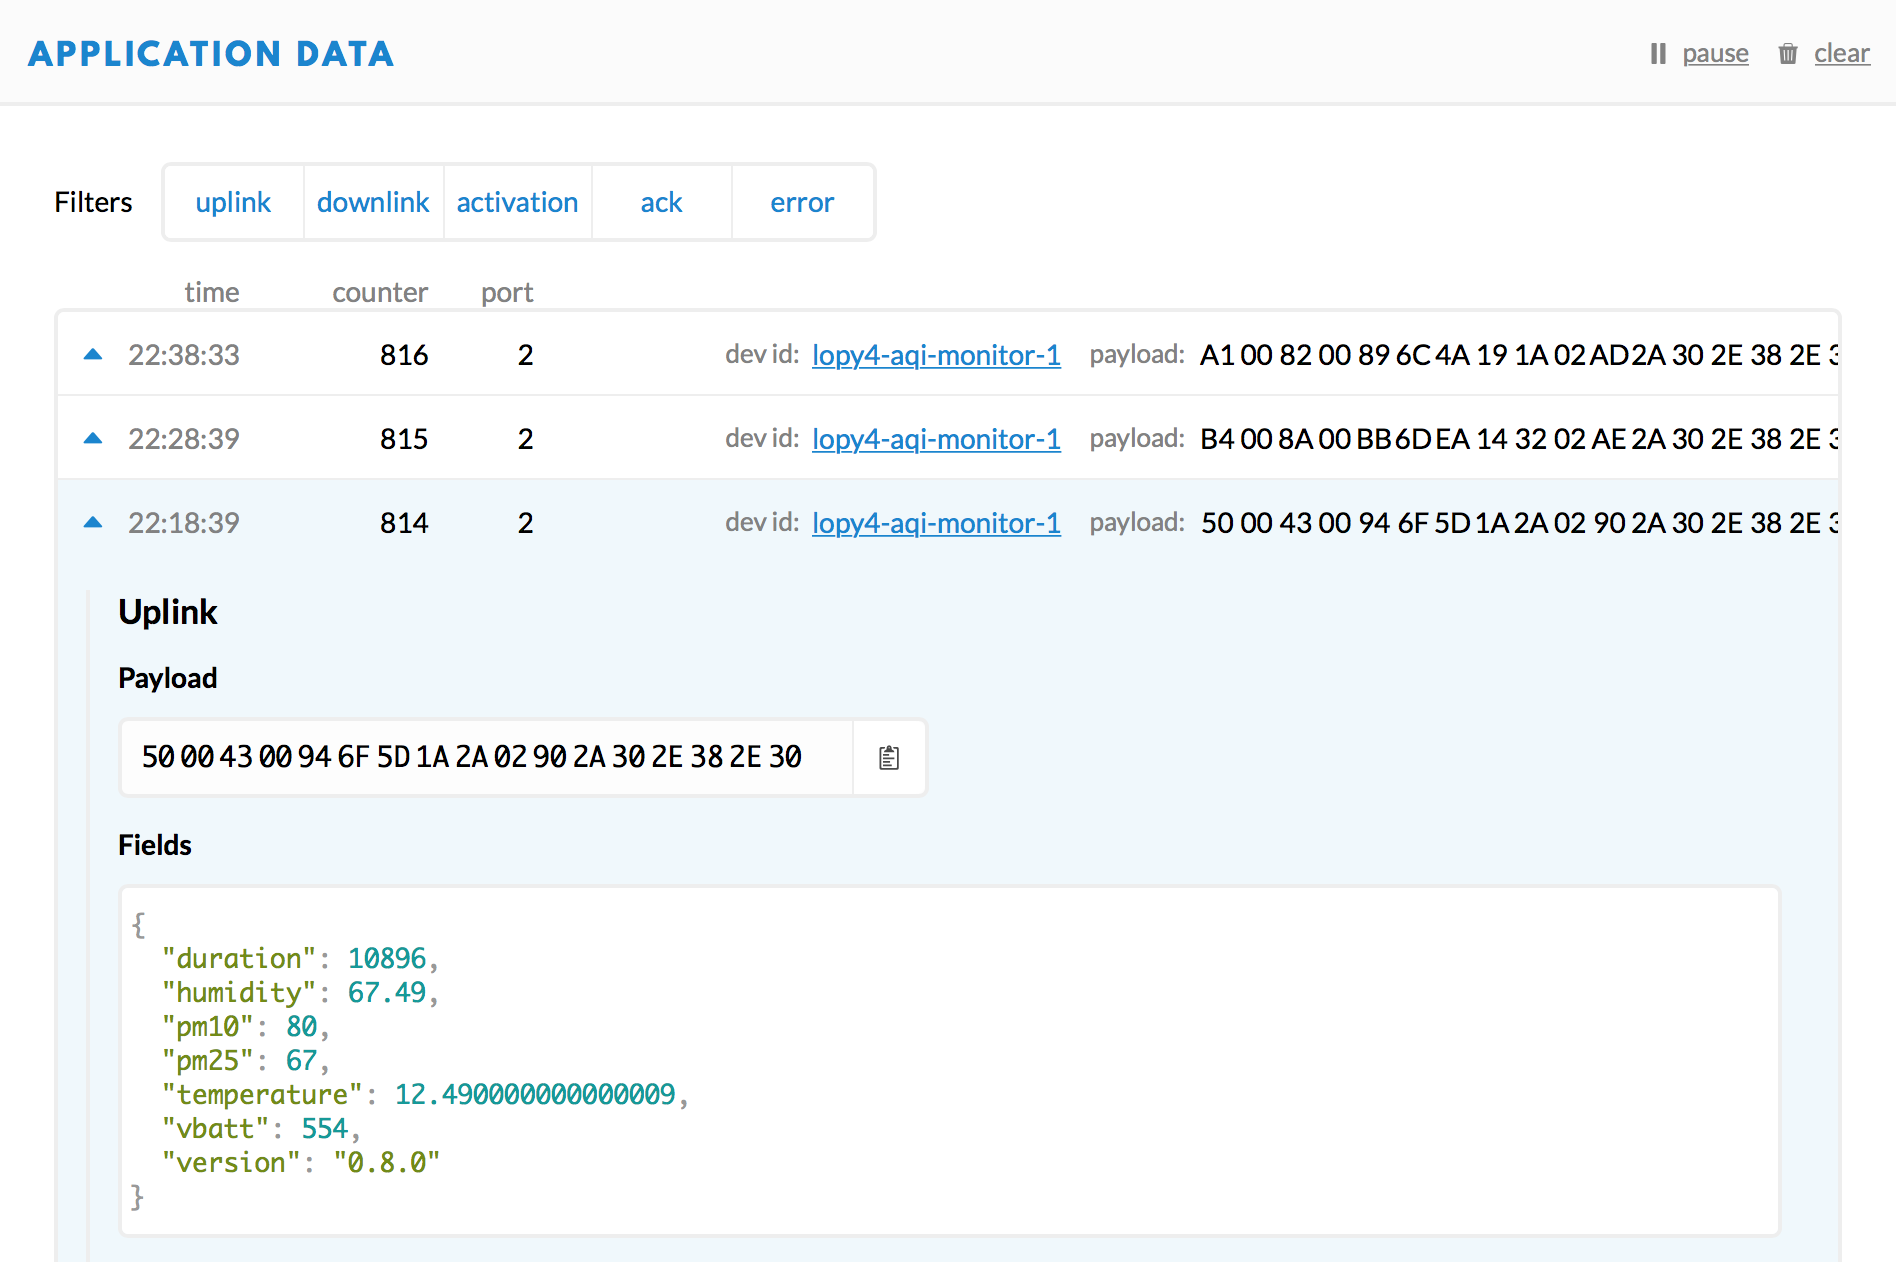
The HTTP integration with lora-forwarder was the last step. Now, given that the gateway is online, the node is in range, and TTN, Heroku and my Raspberry Pi are up, we should see the data appearing on a graph. Let's take a closer look at the single payload, sent at 22:18:39 CET.
Here you can see the node data reaching the gateway:
The gateway recognizes the app and forwards the payload accordingly. The app decodes the payload to JSON:
The JSON data, via HTTP Integration, is passed on to lora-forwarder, which posts it to InfluxDB:
[caption id="attachment_528" align="aligncenter" width="580"]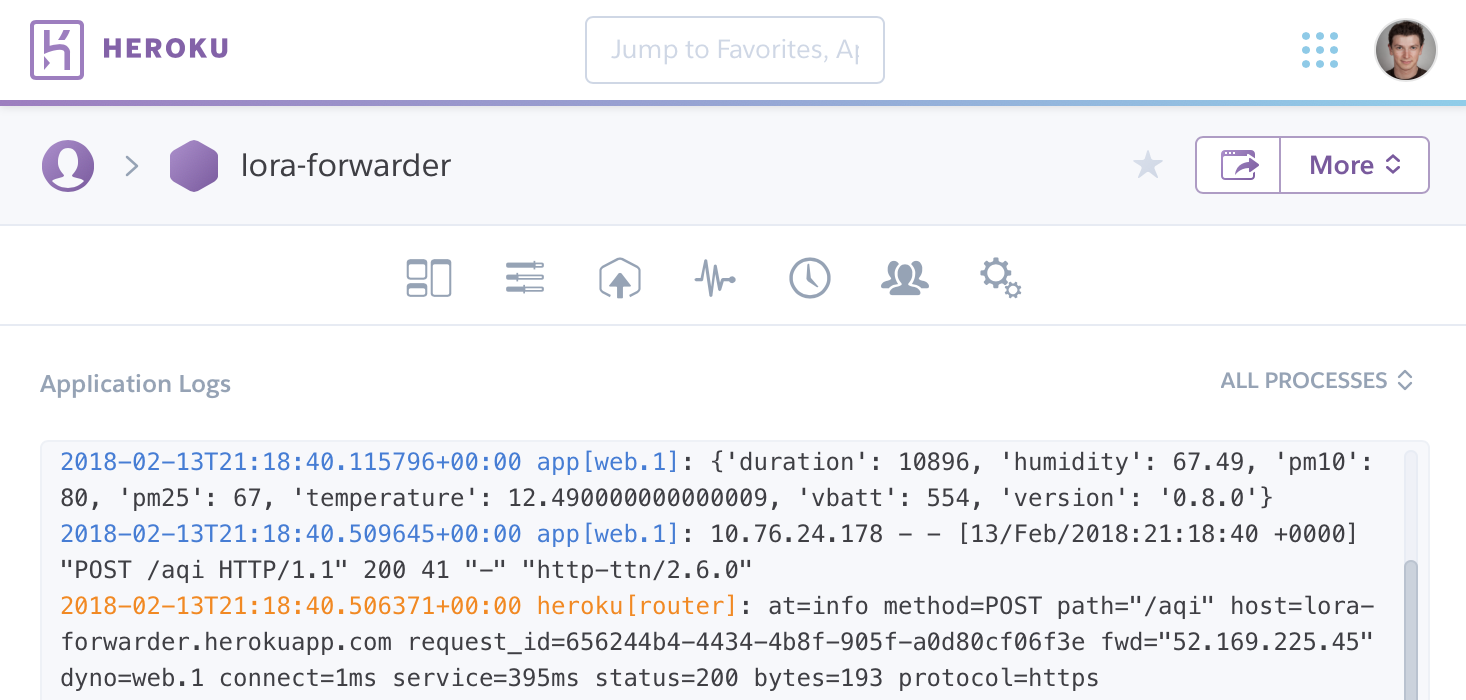 Timestamps are in UTC here.[/caption]
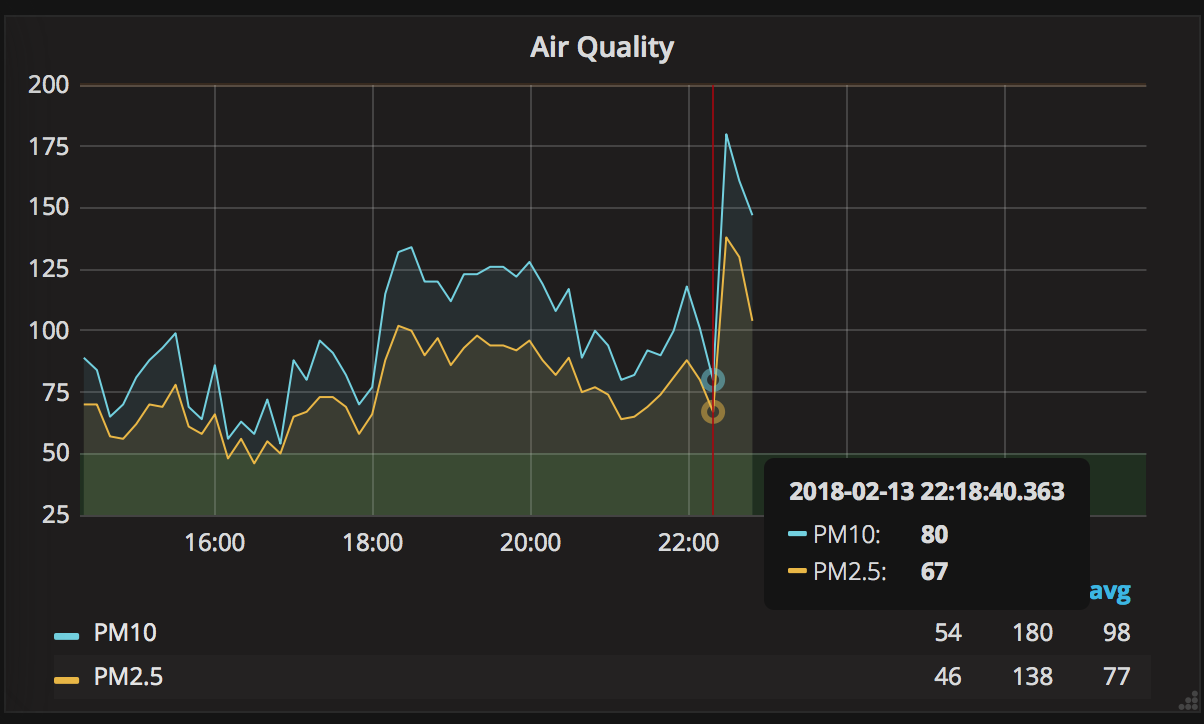
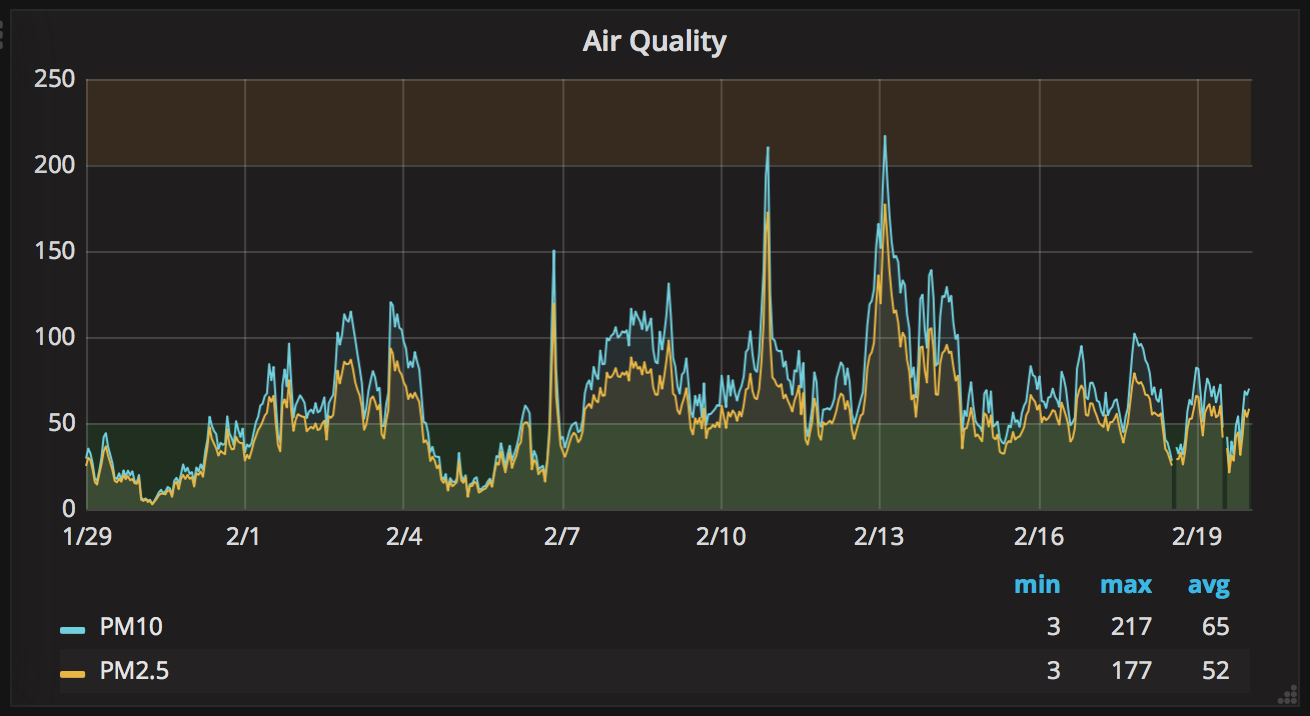
InfluxDB is read by Grafana that displays the data:
You might say "Cool, but why bother?". Well, this time there's far more to it than just "because you can".
Why bother
Power consumption
The LoPy4 board draws approximately 140mA current with wifi enabled. When LoRa is active, with wifi disabled, the current is not bigger than 38mA. This is a huge saving, and that's what you could expect having learnt that LoRa is a low power network. But this is just the beginning.
If you think of sending 30 bytes of data via wifi, you'd normally assume that it's gonna take a couple of seconds. After the device turns on the radio, it scans for the known network, joins it, acquires IP address from DHCP, and then it can transmit the payload. It can take as long as 10 seconds, or even more if the router signal is poor.
Now the killer feature is that the node joins LoRaWAN much faster, plus you can actually store LoRaWAN connection state in the non-volatile memory and retrieve it next time you need to send data. In a long run, the node is able to send data immediately after switching on the radio, and the total time when the LoRa radio is on is measured in milliseconds.
Take the air quality sensor as an example. With wifi connectivity, it sent data in 6-measurement batches (every hour) and it ran for 2 weeks on a 2400mAh battery. With LoRa, I'm sending data one by one (every 10 minutes), and after 2 weeks the battery voltage dropped from 4.15V to 3.77V (still well above the 3.7V limit). And the air quality monitor is not the perfect example because with every measurement the sensor alone draws 200mA for around 10 seconds. If it only measured temperature and humidity, I'd expect it to work for years.
Update 20/02/2018:
I disconnected the sensor when the battery voltage dropped to 3.71V after 22 days of uninterrupted uptime, which is over 50% longer than when working on WiFi.
Range
If constrained by wifi connectivity, you can't get more than a couple dozen metres of range for your device, maybe a couple hundred metres in open terrain with very well-matched high-gain antennas on both ends. This is a piece of cake for LoRa, where a range of several kilometres is nothing unusual.
Also, let me remind you that LoRaWAN infrastructure is not required if you'd like to take advantage of LoRa transmission. It's possible to set up a two-way 1-1 LoRa communication between two LoRa-enabled devices, where you have full control over the amount and format of data being transferred.
Costs
One would argue that for a long-range communication you could use GSM, especially with its IoT-friendly technologies like NB-IoT and LTE-M. In many situations, this is the only option and it's fine, but it comes at a cost. Firstly, you need the right hardware, and GSM-enabled devices are usually pretty expensive. And then there comes the service fee you need to pay to your GSM operator.
Now compare it to LoRa-enabled chips, that you can get for as little as €15 with no additional recurring costs. For me, the choice is obvious, as long as I can ensure that the node will remain within the range of the gateway/receiver.
The other aspect is that in some cases by switching to LoRa you can decrease the complexity of your device. In my case for example, when sending data one measurement at a time, I don't need to track exact timestamps of data points anymore – this means I could get rid of the external RTC module. Not only it reduces the overall cost of the device, but it also simplifies the code (which is always welcome), and even improves battery life a tiny bit.
To sum up, after first trials, I am just amazed by LoRa and LoRaWAN technology. The possibilities are enormous if you consider the really long range, fantastic battery life and low overall deployment cost. As LoRaWAN is pretty much a social network at the moment, everyone can contribute to its expansion by setting up a gateway (the real one though, not the nano GW). I'm definitely getting one in the next couple of weeks and I'll try to make it useful not only for me but possibly for my neighbourhood, by deploying some devices around the building ;)